

✨ This article was AI edited. Editorial responsibility: TopElectricShavers.net.
Produced with AI. This article was artificially generated. Editorial responsibility: TopElectricShavers.net.
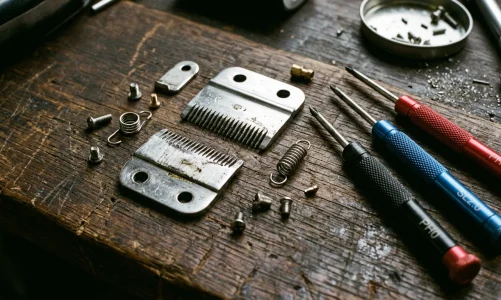
German 5-in-1 clipper spring assembly instructions guide the mechanical reinstallation of the precision tension torsion spring and oscillating runner onto Wahl, Moser, and Ermila German-engineered adjustable blade sets (part numbers 1854, 1855, and 1884). When cleaned or disassembled, the high-tensile spring often unseats from its dual stabilizing channels, preventing blade engagement until the guide prongs, plastic slide carrier, and cutting blade are properly aligned and tensioned against the stainless steel comb plate.
Professional groomers, barbers, and home hairstylists frequently rely on German-manufactured “5-in-1” adjustable blade cassettes found on top-tier clippers such as the Wahl ChromStyle, Wahl Arco, Wahl Bravura, Moser Li+Pro, and Ermila Motion. Engineered with exceptional tolerances in Unterkirnach, Germany, these blade systems consolidate five distinct cutting lengths (#9, #10, #15, #30, and #40) into a single snap-on cartridge.
However, during deep cleaning, disinfection, or accidental drops, the blade cassette can snap apart, releasing the high-tension wire torsion spring. For many users, putting the spring and carrier back together feels like solving a Chinese puzzle box. In this technical walkthrough, we break down the assembly physics, tool requirements, safety protocols, and step-by-step rebuilding methodology.
Contents
- Anatomy of the German 5-in-1 Blade Cassette
- Required Tools and Preparation Workspace
- Step-by-Step Spring Assembly Instructions
- Step 1: Clean and Degrease All Components
- Step 2: Position the Plastic Slide Carrier on the Top Blade
- Step 3: Seat the Spring Loops into the Plastic Carrier
- Step 4: Engage the Rear Retaining Notches on the Base Comb
- Step 5: Verify Length Adjustment Tines (#9 to #40)
- Step 6: Lubrication and Burnishing Cycle
- Common Troubleshooting Scenarios
- Frequently Asked Questions
Anatomy of the German 5-in-1 Blade Cassette
Understanding each component’s mechanical function is essential before attempting reassembly. The cassette consists of five primary parts:
| Component | Material | Mechanical Function | Assembly Failure Symptom |
|---|---|---|---|
| Base Comb Plate | Hardened German Stainless Steel | Provides stationary teeth and bottom tracking channels for length selection. | Rattling or uneven hair feeding if warped. |
| Oscillating Top Blade | Precision Ground Steel | Moves horizontally at 5,000+ RPM to shear hair follicles against comb teeth. | Snagging or zero cutting action if inverted. |
| Plastic Slide Carrier / Runner | Nylon Composite Polymer | Holds the top blade, engages the motor drive eccentric cam, and seats spring legs. | Cracked retaining tabs cause blade release during operation. |
| Torsion Tension Spring | High-Tensile Spring Wire | Exerts downward downward vertical pressure (approx. 2.5–3.2 lbs) to keep blades flush. | Loud buzzing, blade teeth gaping, or violent vibration. |
| Snap Hinge Tongue | Zinc Alloy / Polymer | Anchors the assembly to the clipper chassis drive head. | Blade cassette unclips during grooming pressure. |
Required Tools and Preparation Workspace
- Tools: Small flathead precision screwdriver (2.0mm), needle-nose hobby pliers, magnifying work lamp or headset.
- Chemicals: Isopropyl alcohol (99%), clipper blade wash, high-purity mineral clipper oil (e.g., Wahl Clipper Oil).
- Safety Notice: Wear safety glasses. The German torsion spring is under substantial load and can easily launch across the room if released prematurely.
Step-by-Step Spring Assembly Instructions
Step 1: Clean and Degrease All Components
Before assembly, soak the steel comb plate, top oscillating blade, and plastic runner in isopropyl alcohol or blade wash to remove all hair fibers, dried sebum, and congealed lubricant. A single trapped hair behind the slide carrier can alter blade tolerance by 0.05mm, resulting in loud rattling and thermal friction build-up.
Step 2: Position the Plastic Slide Carrier on the Top Blade
Inspect the plastic slide carrier. You will observe two small molded plastic alignment pins on its underside. Press these pins firmly into the corresponding alignment holes located on the back of the small oscillating top blade. The teeth of the top blade must face forward in the same direction as the carrier’s drive pocket.
Step 3: Seat the Spring Loops into the Plastic Carrier
Examine the German torsion spring. It features a central bridging arch with two coiled loop shoulders and two extending straight tension legs. Slide the coiled loops into the dual semicircular retaining pockets of the plastic carrier. Ensure the extending spring legs point backward toward the rear heel of the blade cassette.
Step 4: Engage the Rear Retaining Notches on the Base Comb
Place the base comb plate flat on your work mat with the teeth facing away from you. Take the sub-assembly (blade, carrier, and spring) and set it onto the comb plate:
- Angle the extending legs of the tension spring so they nest directly into the two small stamped metal anchor recesses at the rear of the comb plate.
- Using your thumbs or a flathead screwdriver tip, press downward and slightly forward on the central arch of the spring. You will feel heavy spring resistance.
- Push the plastic carrier forward until its front guide tabs slide underneath the retaining lip of the base comb plate. A distinct mechanical “click” signifies that the spring legs are locked into their operational retention grooves.
Step 5: Verify Length Adjustment Tines (#9 to #40)
Flip the blade cassette over and manipulate the black plastic adjustment lever on the rear. The top blade should smoothly shift forward and backward across the 5 detent positions:
- Position 1 (#9 – 2.0mm): Top blade pulled furthest back from comb edge.
- Position 2 (#10 – 1.5mm): Standard utility trim.
- Position 3 (#15 – 1.0mm): Medium-close graduation.
- Position 4 (#30 – 0.5mm): Very close surgical/taper trim.
- Position 5 (#40 – 0.1mm): Ultra-close bald fade finish.
Step 6: Lubrication and Burnishing Cycle
Never mount or power a freshly assembled German 5-in-1 blade dry. Apply 3 drops of Wahl Clipper Oil across the cutting teeth and 1 drop into the slide track on either side. Snap the blade onto your clipper and run the motor for 30 seconds at idle speed. Listen for a quiet, rhythmic hum. If you detect high-pitch grinding or chattering, the tension spring legs are unseated on one side.
Common Troubleshooting Scenarios
| Issue | Underlying Cause | Correction Protocol |
|---|---|---|
| Spring Pops Off When Snapping Blade Onto Clipper | Spring legs seated on top of the comb plate rather than inside the recessed anchor notches. | Disassemble and ensure both spring tips drop completely into the stamped metal catch pockets. |
| Clipper Bites or Chews Hair Instead of Cutting | Insufficient spring tension caused by bent spring coils or worn carrier guide rails. | Gently bend the spring legs downward by 10–15 degrees before insertion, or replace the carrier. |
| Extreme Heat After 2 Minutes of Use | Over-tightened spring or lack of lubrication causing boundary friction. | Clean thoroughly with blade spray; verify horizontal float of top blade by hand. |
Frequently Asked Questions
Can I buy a replacement spring without buying a whole new German 5-in-1 blade?
Yes. Many barber supply distributors and specialty grooming repair vendors sell “Wahl/Moser 5-in-1 Rebuild Kits” which include the tension spring, plastic slide runner, and adjustment tongue for \$6 to \$10, saving you from purchasing a full \$35–\$50 replacement blade cartridge.
Why is my German 5-in-1 clipper blade running excessively loud after reassembly?
Excess noise almost always indicates that the spring is seated unevenly—exerting pressure on only one side of the oscillating blade—or that the plastic drive pocket has worn out, allowing the motor’s eccentric pin to wobble loosely.
How often should I disassemble a German 5-in-1 blade set?
Routine full disassembly is only recommended every 3 to 6 months for deep sterilization or spring replacement. For everyday maintenance, simply push the top blade teeth with your thumb to eject loose hair and rinse with pressurized clipper spray without unhooking the internal spring.
Get our latest guides, news, and insights highlighted in your Google Search & AI Overviews.


 THE 60-DAY HAIR CHALLENGE