
✨ This article was AI edited. Editorial responsibility: TopElectricShavers.net.
Produced with AI. This article was artificially generated. Editorial responsibility: TopElectricShavers.net.
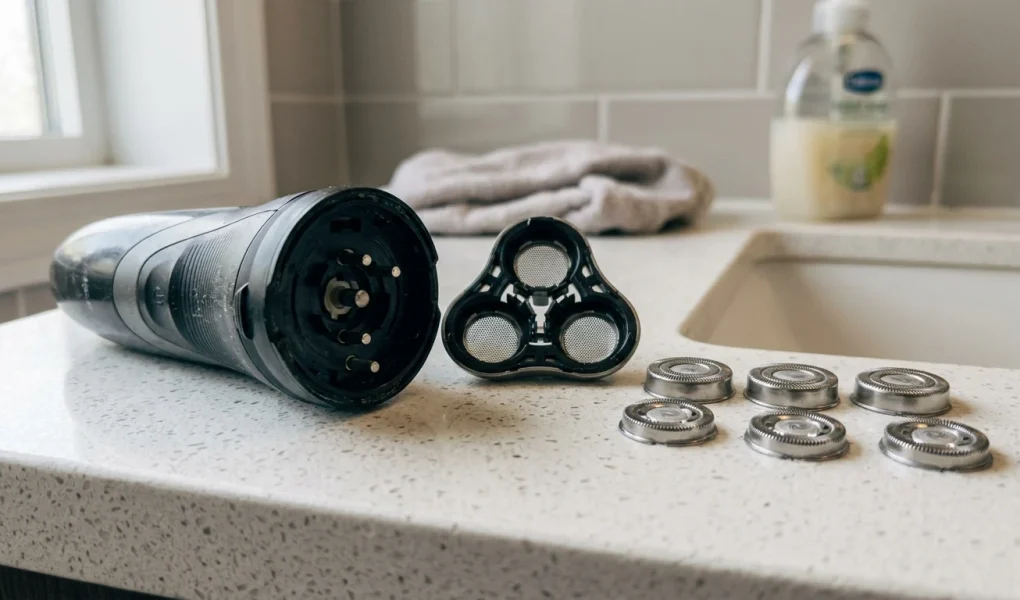
Changing heads on a round shaver involves unclipping the rotary bracket, releasing the central lock wheel, removing the worn inner cutter and outer comb pairs, and inserting fresh matched rotary blades into their directional alignment slots. Standard rotary shaving units (such as Philips Norelco SH30, SH50, and SH90) require replacement every 12 to 24 months to prevent skin irritation, eliminate hair pulling, and restore peak motor cutting torque.
Rotary electric shavers—commonly recognized by their distinctive triangular head arrangement featuring three circular cutting discs—rely on high-speed rotational friction to shear facial hair flush against the skin. Unlike foil shavers that utilize reciprocal linear blades beneath a micro-thin perforated screen, round shavers continuously spin precision-engineered surgical steel cutters beneath stationary slotted caps (known technically as combs).
Over hundreds of shaving sessions, the microscopic cutting edges of these rotating blades gradually dull from abrasive contact with keratin fibers, dried sebum, and mineral deposits from tap water. When cutting efficiency deteriorates, users instinctively apply excessive downward pressure against their jawline and neck. This compensation inevitably produces friction burns, erythema, and pseudofolliculitis barbae (painful ingrown hairs). Replacing worn rotary heads restores factory cutting tolerances, extends battery longevity, and protects the underlying mechanical motor drive.
Contents
- Anatomy of a Round Rotary Shaving Unit
- When Should You Change Your Round Shaver Heads?
- The “Matched Pairs” Principle: Why You Must Never Mix Cutters and Combs
- Step-by-Step Instructions: Changing Heads on a Round Shaver
- Replacement Head Compatibility Reference
- Post-Installation Break-In and Lubrication Routine
- Troubleshooting Common Post-Replacement Issues
- Frequently Asked Questions
Anatomy of a Round Rotary Shaving Unit
Before disassembling your device, understanding how individual rotary components interact prevents accidental damage during reassembly. A modern 3-head rotary shaving unit consists of five distinct structural layers:
- Outer Retaining Frame (Head Housing): The hinged exterior shell that clips onto the shaver body, containing circular recesses designed to seat the blade assemblies.
- Rotary Combs (Outer Guards): The circular metal discs visible from the outside. These feature dual-track slots and micro-holes designed to funnel flat-lying hairs toward the cutting edge while insulating epidermal skin layers from direct blade contact.
- Rotary Cutters (Inner Blades): High-precision stainless steel circular wheels equipped with 9 to 15 curved cutting teeth that spin at approximately 2,000 to 2,800 RPM directly against the inner surface of the combs.
- Retaining Ring / Lock Mechanism: Either a one-piece plastic retaining bracket or three independent colored locking rings that physically clamp the cutters and combs against the housing.
- Drive Spindles: Spring-loaded motorized shafts extending from the shaver body that interface with the hexagonal or slotted drive sockets on the underside of each cutter.
When Should You Change Your Round Shaver Heads?
Most manufacturers recommend replacing rotary heads every 12 months, but real-world replacement cycles depend heavily on facial hair density, grooming frequency, and maintenance habits. Watch for these distinct diagnostic symptoms indicating that your round heads have reached end-of-life:
| Symptom | Mechanical Root Cause | Urgency Level |
|---|---|---|
| Hair Tugging & Pulling | Rounded blade edges pinch rather than cleanly shear hair shafts | Immediate Replacement |
| Increased Neck Irritation | Compensatory excessive pressure pushes skin folds into comb slots | Immediate Replacement |
| Audible Motor Pitch Drop | Blunted friction increases drag torque on internal drive gear train | Within 30 Days |
| Visible Slit Warping on Combs | Metal fatigue from impacts or aggressive cleaning tapping | Immediate (Risk of Laceration) |
| Replacement Indicator Light | Internal shave-time counter has reached manufacturer threshold (usually 400+ shaves) | Scheduled Maintenance |
The “Matched Pairs” Principle: Why You Must Never Mix Cutters and Combs
One of the most critical engineering principles of round shavers is that each cutter and comb wear together as an individualized matched set. During operation, micro-asperities in the steel create unique wear tracks. If you mix an old cutter with a different comb during a cleaning or partial replacement session, the microscopic mating surfaces will no longer align. This misalignment creates friction hot spots, degrades cutting performance, and accelerates steel degradation.
When installing replacement heads, always replace all three sets simultaneously using the fresh factory-matched pairs supplied in your replacement kit. Never attempt to “rotate” heads between different sockets to equalize wear.
Step-by-Step Instructions: Changing Heads on a Round Shaver
While minor locking bracket differences exist between brands (e.g., Philips Norelco vs. Remington), the core mechanical procedure remains uniform across virtually all 3-head rotary architectures. Follow this protocol carefully:
Phase 1: Pre-Disassembly Inspection & Preparation
- Disconnect the electric shaver completely from any charging cables or wireless docks. Never perform mechanical maintenance on an actively charging device.
- Depress the power switch for 3 seconds to verify the travel lock is engaged, preventing accidental motor activation.
- Spread a clean microfiber towel over your countertop. This prevents tiny locking rings, springs, or individual cutters from rolling into the sink drain or bouncing off hard tile.
Phase 2: Releasing the Retaining Mechanism
Depending on your shaver generation, you will encounter one of two locking systems:
Method A: Central Turn-Lock Dial (Common in Philips Norelco Series 3000, 5000, and AquaTouch)
- Press the one-touch release button on the front of the shaver neck to spring open the shaving head unit.
- Locate the central locking star or thumb-wheel in the middle of the interior plastic bracket.
- Rotate the central wheel counter-clockwise (anti-clockwise) approximately 45 degrees until you feel a definitive click or detent release.
- Gently lift the plastic retaining bracket straight up away from the housing and place it onto your work surface.
Method B: Individual Bayonet Locking Rings (Common in Series 7000, 8000, and 9000)
- Open or detach the shaving unit from the motorized handle.
- Take the specialized plastic retention ring tool included with your replacement head pack (or use your fingertips if equipped with ribbed outer grips).
- Turn each individual retaining ring counter-clockwise by roughly a quarter-turn.
- Lift off each retaining ring individually. Note that some high-end units feature color-coded rings to differentiate clockwise from counter-clockwise installation orientations.
Phase 3: Extracting Worn Parts and Cleaning the Sockets
- Carefully lift out the three worn cutter-and-comb sets from their respective chambers. Discard them responsibly.
- Using an anti-static soft bristle grooming brush, clear out accumulated micro-hair stubble, dried skin cells, and residue from the internal head housing and drive gear sockets.
- Rinse the bare plastic housing under warm running tap water and dry it thoroughly with a lint-free cloth. Do not use compressed air, which can dislodge internal rubber water-sealing O-rings.
Phase 4: Seating Fresh Replacement Heads
- Unpack your new replacement round heads (e.g., SH30, SH50, or SH90). Ensure each inner cutter is resting comfortably inside its corresponding outer comb guard.
- Observe the edge of each outer comb: you will see small notched tabs or alignment wings engineered onto the perimeter rim.
- Align these tabs precisely with the matching keyways cut into the housing sockets. When positioned correctly, the combs will sit completely flat without rocking or tilting.
- Check from the top exterior view: the three circular combs should sit flush, level, and equidistant from each other.
Phase 5: Locking the Unit and Resetting Electronics
- Reinstall the retaining frame or individual bayonet rings over the newly seated heads.
- Rotate the central locking wheel clockwise until it snaps firmly into the locked indicator position (or twist individual bayonet rings clockwise until tight).
- Inspect the underside: verify that none of the plastic retaining legs are bowed or misaligned over the cutter hubs.
- Snap the hinged shaving head closed against the main shaver handle until the latch clicks securely.
- Electronic Counter Reset: For shavers equipped with a replacement indicator light (such as the Philips Norelco Series 5000/7000/9000), press and hold the power button for 7 to 10 seconds while the unit is connected to standby power. You will hear an audible confirmation chime or see the orange head icon flash and disappear, resetting the internal 12-month telemetry timer.
Replacement Head Compatibility Reference
Installing incorrect head models can lead to loose tolerances, excessive vibration, or gear stripping. Verify your specific replacement model code prior to ordering:
| Shaver Model Family | OEM Replacement Code | Blade Engineering Type | Locking System |
|---|---|---|---|
| Philips Series 1000, 2000, 3000 | SH30 / HQ56 | ComfortCut (Single-Track) | Central Star Bracket |
| Philips Series 5000, AquaTouch | SH50 | MultiPrecision (Dual-Track) | Central Turn-Lock Dial |
| Philips Series 7000 | SH71 | SteelPrecision (SkinGlide Coated) | Bayonet Ring Set |
| Philips Series 9000 / Prestige | SH91 / SH98 | NanoTech Dual Precision | Bayonet Ring Set |
| Remington R3000, R4000, R5000 | SPR-PR13 | PowerFlex Dual Track | Hinged Retention Plate |
Post-Installation Break-In and Lubrication Routine
Brand-new replacement steel cutters need a brief break-in interval to lap cleanly against their complementary comb surfaces. To optimize performance and reduce initial friction wear:
- Apply Synthetic Clipper/Shaver Lubricant: Place one drop of dedicated mineral-based electric shaver oil onto each of the three circular combs.
- Execute a Dry Run: Power on the shaver and let it run freely for 15 to 20 seconds without contacting skin. This allows the micro-droplet of oil to distribute evenly across all 360 degrees of the cutter tracks.
- Wipe Excess Residue: Gently blot the exterior of the combs with a tissue to remove excess surface oil.
- First Shave Technique: For the first 3 to 4 grooming sessions, shave with light, circular strokes. Do not press hard into the skin while the fresh edges are seating into their operational wear patterns.
Troubleshooting Common Post-Replacement Issues
If you encounter operational issues immediately following head replacement, inspect these mechanical alignment points:
- Shaver Sounds Loud, Rattling, or Whiny: One of the three circular combs is seated crookedly in its socket, causing the retaining bracket to pinch the spinning cutter. Reopen the head, confirm that the notch tabs are firmly in their matching grooves, and retighten.
- Shaver Stalls or Refuses to Spin: The retaining bracket was overtightened or cross-threaded, binding the drive shafts. Loosen the central dial, reseat, and tighten only until the click detent engages.
- Shaving Unit Pops Open During Use: Hair debris was caught in the spring-loaded release catch latch during disassembly. Clean the latch recess with a brush and ensure the release button fully snaps shut.
Frequently Asked Questions
Can I sharpen round electric shaver heads instead of replacing them?
While DIY abrasive pastes and sharpening stones exist on the market, sharpening rotary shaver heads is not recommended. Rotary combs are manufactured to micro-millimeter tolerances. Applying abrasive compounds alters the exact clearance between cutter teeth and guard slots, resulting in uneven hair slicing and increased risk of skin pinching.
Why is my replacement indicator still flashing after installing new heads?
Rotary shavers do not have optical or physical sensors that detect whether the blades are new. They rely on an internal electronic timer based on total motor run time. You must manually reset the indicator by pressing and holding the power button for 7 to 10 seconds while the shaver is powered off.
Can I clean my new round heads in ultrasonic cleaners?
Yes, completely detached rotary combs and cutters can be safely sanitized in a water-based ultrasonic bath using a mild surfactant. Never submerge the electrical motor handle unless the manufacturer explicitly certifies IPX7 submersible compliance.
Get our latest guides, news, and insights highlighted in your Google Search & AI Overviews.



 THE 60-DAY HAIR CHALLENGE